DIY Canning for Easy Personalized Gifts
If you have a large family, lots of friends or a group of co-workers that love to exchange tokens of gratitude for the year, you need to start looking for bargains and easy crafts now. Fortunately, we are getting closer to the time when all sorts of wonderful summer fruits are going to be their peaks of ripeness and sweetness. You can take some of these lazy summer days and spend them canning! Add some pretty can labels and enjoy the compliments.
Make All of your Favorites
The first step to canning is to decide what you want to make. Jams, jellies and preserves are the categories that you see in the store; the same can be made at home. If you’re working with fresh fruits, however, stick to preserves: This designation means that you are preserving the fruits with as little preparation and additional ingredients as possible. You can also can vegetables for a savory treat although they are less of a sure bet than something sweet.
Equipment
If you’re not familiar with the canning process, you’ll need to get your equipment first. Canning does not actually just mean using tin cans like at the grocery store. At home, you’ll be using special jars to keep the preserves free from contaminants. Make sure you get the right kind, and check all of the seals on the lids and the rings before you use them. Next, find your ingredients. The higher quality the initial produce, the better your results will be. Check a farmers’ market if your city has one. At the store, pick up some sugar and some pectin, which helps thicken and preserve the ingredients.
Process
You’ll start by boiling your jars and lids to kill all the bacteria on them. You’ll also boil down your fruit. The sugar doesn’t just make it taste good; the food needs a certain amount of salt, sugar or acid to keep bacteria from growing. After putting the ingredients into the jars and sealing them, you’ll pop them into a a pressure canner. Don’t just use your pressure cooker though; you need this device to make sure everything is properly sealed! While the jars cool, sit back and listen: You should hear little ‘pops’ as the safety dimples on the caps are sucked in. That’s when you know you got it right.
Decorate
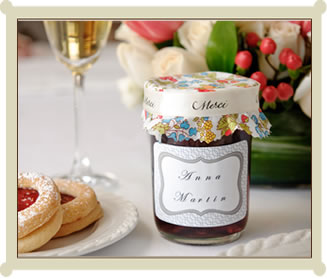
Now that you’ve gotten the tough part out of the way, take some time to convert this practical, tasty food into a real gift. Look for can label templates online so you can make sure to note what type of preserves is in each jar. You can also find stickers for the jar lids to designate your recipients.
For an extra touch, plan ahead to coordinate your can labels with decorative wrapping. Most label templates you will find are brightly colored and beautifully designed. Look for patterned fabric and ribbon scraps to make a gift that is personalized and will be cherished for as long as the contents last!

BIO: Scott is a freelance writer on a variety of topics including custom digital printing. When he is not writing for Print360.com he is hiking in the mountains of upstate New York.


